Monday, February 21, 2011

Easy Homemade Oil Lamps

Never buy candles again.With spring approaching, our thoughts turn to reclaiming our yard, planning a garden and the hurricane season. Normally I stock a supply of candles and wince at the cost, wishing I had more oil lamps. I don't know why but I suddenly remembered that my mother used to make them in mason jars. So, I thought I'd do some experimenting and go for "pretty" while I was at it.

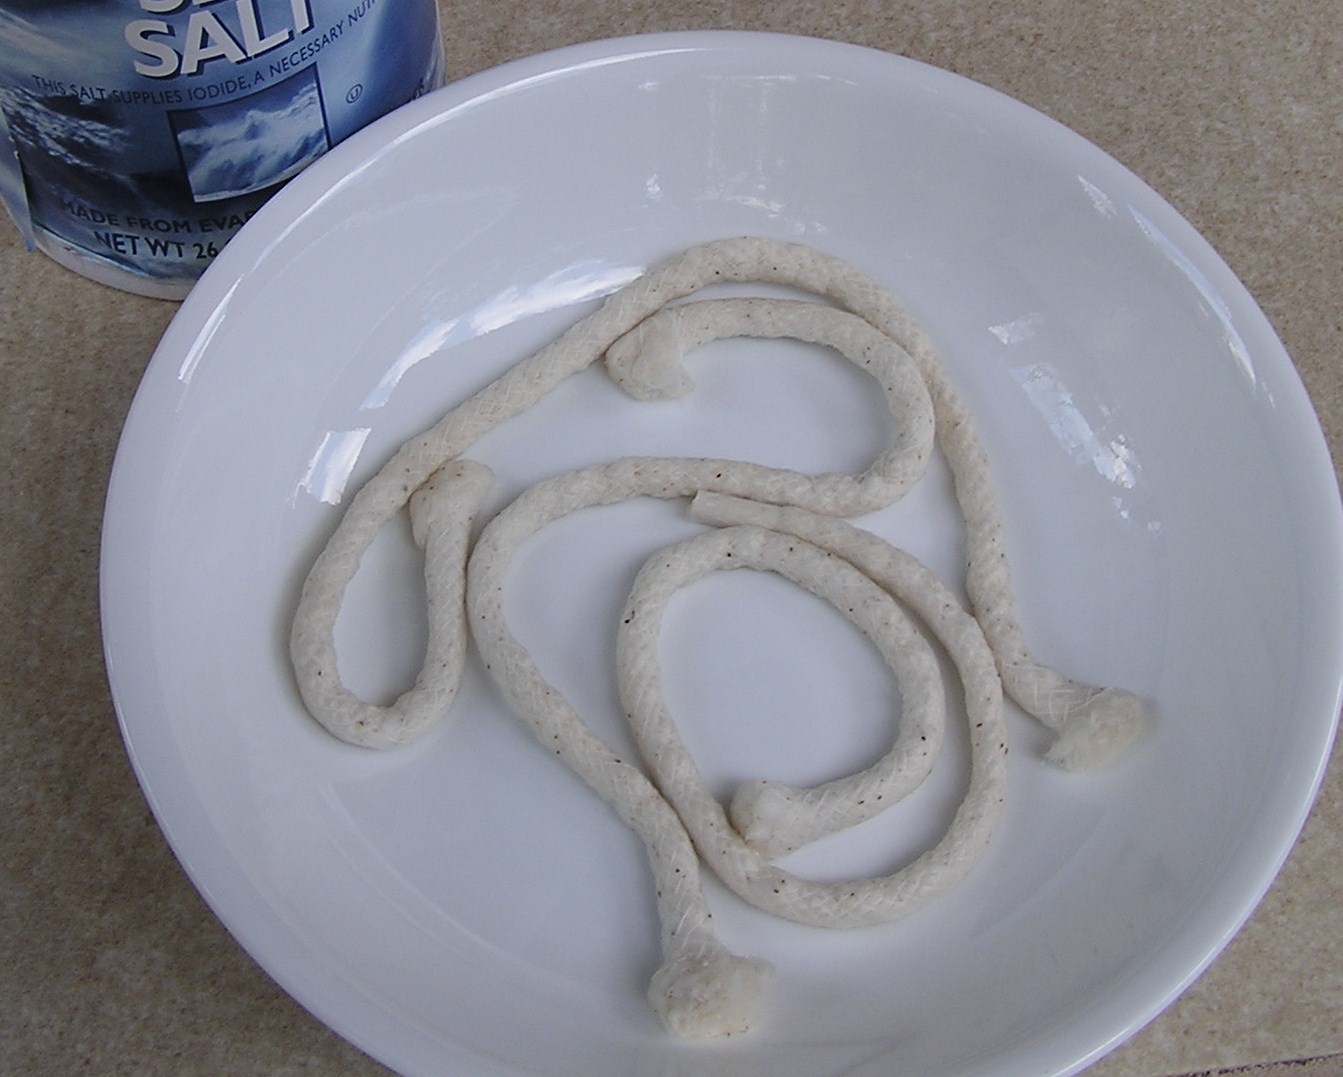
1- Use 100% cotton wick material...a strip of cotton fabric or twine will do. I used cotton "filler cord" from the fabric department, 10 yards for $2.29. That's a lot of wick! 2- cut your pieces (6" to 12" long) and soak them in water. Shake off the excess and cover them with salt for several hours so they will burn slower and longer. Remove the salt and let the wicks dry.

3- Select your containers. I chose a candle glass, a sea shell and a little vase I made years ago. 4- You will need wire to stabilize the wick. I used 18 gauge "bright" floral stem wire, 18" long.
5- The purpose of the wire is to hold the wick either up from the bottom of the container or down from the top. So, fashion it accordingly. One thing I learned is that the only part of the wick you want exposed to the air is the 1/4" above the wire that you will light. You will see that I made a small metal sleeve to surround the wick in the little vase. I should have done that with the sea shell and I did coil extra wire around the descending wick in the glass.

6- Test the positioning of your wires in the containers and when you are satisfied, thread the wick through and crimp the wire snugly around the wick. You want it to to be tight but still allow you to pull the wick up once it has burned down.
Use only olive oil as it will not smoke, doesn't smell and, amazingly, it will not burn. You cannot set it on fire - go figure! In fact, if you have fashioned your wire to hang from the rim of your container, you can simply dunk the flame into the oil to put it out. I would suggest covering the lamps with plastic wrap and a rubber band when not in use to keep the oil from evaporating. I'm going to try infusing lavender in some of my oil to see if I will get that wonderful fragrance.
Also, I found this site (LINK) that gives instruction for making the type of clay oil lamps used by the ancients. You might enjoy it. I'm going to give it a try.

I have a party to plan for the weekend and will post the highlights.

Saturday, February 19, 2011

Rainbow on the Water

Have you noticed that life's greatest gifts are most often free? I can't begin to tell you what a miraculous sight this was to me this morning. For years my husband and visitors have spoken, on occasion. of the rainbow on the surface of our cypress pond and try as I would, I could never see it.
In the still of a Spring morning, the surface of the pond is often dusted with a fine layer of pollen. Until today, it has only made me think of the dreaded allergy season and I have anxiously waited for the slightest breeze to clear the surface and return the mesmerizing reflections that I love so much.
I don't know how or why it is that I actually saw the colors this morning because I'm colorblind and see almost no colors at all. But this morning, for a few minutes, I received one of those incredible free gifts. From the palest lime green, to a soft aqua, to a beautiful baby blue, blending into a lovely, light lavender, then into a perfect pink, and to peach and finally to a sunny yellow in the distance: I saw the colors, each and every one of them. Now, I know how it is that others have found the dusty pond so beautiful. I ran for the camera and couldn't wait to share the pictures...and I couldn't wait to share my excitement. I'm sure that science would attribute my momentary, morning vision to a particular angle or intensity of the sun or refraction or something like that. But for me it was a miracle moment and it filled my entire day with all the hope and promise that comes with a rainbow...my very first rainbow on the water.

Monday, February 7, 2011

Making a Unique Child's Shelf Unit

I've been trying so hard to think Spring into existence but it isn't working. These arctic fronts just keep rolling in. I thought getting down to 29 overnight again was something to grumble about until I spoke with my Alaska daughter today. She reported the noontime temperature at -4. Brrr. It reminded me that I only need to be patient a couple of weeks longer while Alaska won't see Spring until late May. I can hardly believe that I used to consider that "normal". But Alaska winters provided tons of time for projects.

Then I remembered this little shelf unit for toys that I made for one of her children and thought you might enjoy the simplicity of it. The construction is so very simple and the materials list consists only of
  • 2 - 1" x 12" x 8' boards,
  • 1 - 1" x 2" x 8' board and
  • a bundle of survey stakes.
  • The few shingles (only 24) can usually be obtained without charge from a construction site with a polite request and a smile.
  • A couple of hinges, a little paint and you're in business.
INSTRUCTIONS:
Cut one of the 1" x 12" boards in half (= 2 boards @ 4' long each) for the sides.
Miter one end of each of these boards at a 45 degree angle so the roof will fit snugly.

From the second 1" x 12" board, cut 5 shelves at 12" long each.
The remaining 3" (more or less) should be cut almost in half for the roof.
(You will need to take into account the thickness of the board as one piece will overlap the other when they are attached to each other at the roof ridge. The idea is for both sides of the roof to be the same length. Trim one if necessary.)

Mark your shelf locations and glue and screw them into place.

Glue and screw the roof boards into place.

Paint the entire assembly.
FOR THE PICKET FENCE:
First, paint all your pickets.
If I remember correctly, I shortened the survey stakes a bit so that they would come just above a shelf edge. From the 1" x 2" board, four pieces are cut a little longer than the survey stakes so that they provide four legs at the corners. The 1" x 2" pieces are trimmed to points at the top end to match the pickets and are glued and screwed into place. Along the sides, between the 1" x 2"s', I painted two horizontal stripes white to simulate the horizontal boards of a fence. The pickets are then glued into position on top of the horizontal stripes. The same general spacing is used for the gate and the vertical pickets are glued and tacked to actual horizontal pieces made from two additional survey stakes.
Add hardware and shingles and you're done. Isn't it cute?

Wednesday, January 26, 2011

The (almost free) Garden Path

Sometimes things bug me to such an extent that I jump into a project with a force that neither lack of funds nor lack of experience will prevent. That was the case with my garden path.
The troubling issue was my unlovely, arrow-straight sidewalk that spans the distance from the driveway to the front porch steps. It seemed that no amount of plantings, and there were many, would soften the edges. And, if that were not enough, there was actually a "view" just beyond the abrupt end of the sidewalk. We have a lovely Cypress pond visible only a few feet from where the sidewalk ended.I wished for a concrete extension but couldn't afford it, which turned out to be a good thing. Behind the garage a pile of left-over bricks had been ignored for some 20 years. Discovering them when we bought the house had been one of my great excitements but I had not come up with an idea for their use...not until the thought of extending the sidewalk. There weren't enough for a solid brick walk but certainly enough for an edging so I set about step one with no idea at all what step two might be.Having carefully laid an outline, I couldn't bring myself to take the bricks up again in order to set them properly in mortar. Instead, I came up with the idea of troweling a trench on either side of the bricks, pouring in dry concrete mix and watering it in with the garden hose. After three years, it seems to have worked wonderfully well.Leveling the path as I went, unfortunately, raised it above ground level at the end. Fortunately, the old concrete picnic table, left to us by the previous owners, sat upon pedestals that had crumbled almost to dust leaving me with two usable benches but no table. The bench tops made perfect steps at the end of the path. The bench bases were fitted with wooden tops so seating was salvaged and the path came to a suitable conclusion.The only actual money spent on the path was for two bags of concrete and several buckets of pea gravel...less than $40 total. I had compacted the sand below the path and watered sand into the gravel, making it firm and reasonably solid under foot.And as long as I was in the yard with the shovel, and not wanting the new path to wash away, I thought to dig a "dry creek bed" to channel the hard rains that gush from the porch roof valley. That required another $15 in gravel. I chose a different and cheaper type.OK, so then I got carried away. The question was how and where to stop the gray gravel of the creek bed when it reached the lawn. Well, the previous owners had circled a Dogwood tree with four of those scalloped, concrete, 1/4 circle edgings. Since scallops are not my cup of tea, I had removed them and didn't one of them call out to me to become a little bridge? Used as support and topped with bricks, it gave a reasonable stopping point to the creek bed.The remaining bricks formed a somewhat whimsical broken wall allowing me to define the line between the front yard and the expanse to the pond.
Thoroughly carried away with the project by this time, I cleared an area in which I intended to plant lush, tropical vegetation, completely forgetting that I had no money for such frivolity.
Believe it or not, Yard Sale plants, cuttings from around my yard and end-of-season sales have filled the space and my country home in the woods is feeling more like Florida every day.
Which brings me to today's project...not that something bugs me so much as it is calling to me...a little something that could be done and therefore must be done. Here's a hint: Goodbye little brick broken wall. Goodbye little brick pillar...and Oh, how I wish for spring! I'll keep you posted.

Friday, January 14, 2011

My Fickle Heart

As 2010 passed into the History books and 2011 rushed in with sunshine and plans for my new garden spot, with a sense of euphoria, I proclaimed to anyone who would listen that I expected this new year to be one of the very best. I imagined smiles on every face and troubles melting "like candy drops". That lasted for less than a week. Then the temperatures plunged. Ugh! After the coldest December in Florida's recorded history, January determined not to be outdone. Temperatures in the 20's, night after night, after night until our entire pond was completely frozen over.
Mind you, I'm from Alaska where we anxiously wait for the lakes and rivers to freeze enough to drive on and across and to spin our trucks in great circles on the ice...but in FLORIDA? My heart was sinking and I found that happy, hopeful new year feeling slipping away.
What are the birds to do?
My birdbaths are frozen solid. The birdhouses are anything but welcoming. Even the squirrels refuse to leave the comfort of their nests and scurry about until high noon.
And at noon, I still found frost on the shaded ground.
But today, frowning (and shivering) as I walked through my frozen yard with the camera documenting the fact that spring was unlikely to come at all, I happened to look up. BUDS! I could hardly believe my eyes. The Dogwood trees are budding.
Even after six weeks of the most incredible cold and killing frosts, these promises of spring appeared almost magically. Suddenly I had hope again. Suddenly I was ashamed of my gloom. And just as suddenly I remembered the often repeated words of my mother, "When you are feeling down...look up".
Now, if I can just keep remembering that throughout this whole year, it might actually be as glorious as I thought it would.

Thursday, January 13, 2011

2010 Recap

With 74 posts to the blog in 2010, only four short of 1 1/2 per week, I didn't do as well as I had hoped but better than I thought. Accumulating extra cash by not spending as much as we have come to believe we need to, remains the focus of this blog. One of the best ways I know is cutting the grocery bill while eating even better at home. Under the Label "Cooking: Recipes & Methods", there were 24 actual recipes, 5 entries about home canning and 1 genuinely cost-cutting trick to saving both money and time.

16 posts dealt with "Holidays & Special Occasions" touching lightly on Easter, going in depth into Independence Day and returning to the inexpensive but memory-making basics of Thanksgiving and Christmas.

"General Thrift" (5), "Trash to Treasure" (4), and "Gardening" (6) centered around things that were going on in my own world. But the six part series on "Preparedness" was a genuine labor and worth visiting, if you haven't, and revisiting even if you have.

Some of the things I intended to do, I didn't. This year, I have no intentions at all. I found that I posted 13 entries under the label "Just Chatting" and with a few exceptions, enjoyed doing those most of all. That leads me to believe that I might become even chattier (is that a word?) this year.

For better or worse, I'll be here...Still Finding Cash...time...hope...and happiness. Hope you will, too.

Wednesday, January 5, 2011

Sweet Potato Salad

The next time you're serving ham, give this a try. It's a great "make ahead" dish.
  • 2 lbs sweet potatoes or yams, peeled, diced, cooked in salted water until tender, drained & cooled
  • 1/2 cup Sweet Onion, chopped fine
  • 4 Green Onions, sliced thin
  • 1 Red Bell Pepper, seeded & chopped
  • 1/2 cup Mayonnaise
  • 2 Tbsp Orange Juice or 1Tbsp Orange Juice Concentrate
  • 1 Tbsp Paprika
  • 1 tsp Curry Powder
Mix all together. Chill 2 hours or overnight.

Saturday, January 1, 2011

Shish Ka-Bab - oh so easy!

Soak wooden skewers in water for at least 20 minutes so they won't burn.

INGREDIENTS (Makes 30 ka-babs)

  • 1 pkg pork tenderloin
  • 2 lbs sirloin tip or top round steaks
  • 1 fresh pineapple
  • 3 green bell peppers
  • 1 red bell pepper
  • 2 bags boiling onions
  • 2 packages button mushrooms
  • 2 lg cans whole potatoes
  • Cherry tomatoes (optional)

Cut pork and beef into 1 1/2" square pieces
Marinate beef for tenderness
Boil onions (with skins on) until almost tender
(let cool, cut off ends and peel)
Cut pineapple & peppers in 1 1/2" squares
Cut any oversize potatoes in half

Skewer in the following order:
Green pepper - beef - onion - mushroom - red pepper - potato - pineapple - pork - green pepper. Brush with olive oil. Sprinkle with salt & pepper.

Cook over hot grill or 2" under broiler for 7 minutes, turn and cook 5 minutes more. (If using cherry tomatoes, add to the skewer tip when the skewer is turned.)

Wednesday, December 22, 2010

Making Christmas Memories ...

with Little or No Money.
I remember the wonder of sleeping under the Christmas tree as a child. It was our night before Christmas eve tradition. There were no DVD movies or pizza delivery. It was very simple...pillows and blankets and p.j.s and three very quiet children each peering up into the branches laden with shiny ornaments and the streaming silver icicles that would catch the colors of the lights with their gentle movement. It was a magical sight, ripe for our imaginations, and mesmerizing to sleepy eyes.
I remember my father making fudge and getting to lick the spoon and I remember wrapping the perfect squares in wax paper to fill tins for gifts. This year my little granddaughter dips pretzels for a gift...an easy task for a little one who wants to feel grown up.
I remember the years when we cut our own tree and I remember the years when we ran through the chill evening air of a tree lot inspecting size and shape. Though our suggestions seldom influenced the final decision, our participation somehow seemed vital and added to the thrill of the tree.
I remember the Christmas that my father built my little sister a miniature kitchen stove and sink and it impressed me so much that a lifetime later, I designed and built one for my first granddaughter.
I designed it so that the all the pieces could be cut from a single sheet of plywood. I will try my best to locate my plans and post them in plenty of time for next year.
It is with such joy and warmth that I remember my mother making decorative candles and the yule log she made and the delightful aromas that drifted from our kitchen day after day and stockings filled only with oranges and apples and nuts and a candy cane. I also remember later years with the living room filled to over-flowing with presents and the stress of budgeting for 5 bicycles, a brass bed and a diamond ring in the same year. Of the differing memories, it's the simple ones that seem the sweetest and this year, it is those memories that I hope to help create.Dream beautiful dreams, little ones!

Friday, December 17, 2010

My Christmas Colors - and other things

SEEKING TO EXPRESS THE REAL MEANING OF CHRISTMAS
In the midst of the glitz and glitter, the clamor and crush of the shopping scene and the high stress, low budget of this Christmas season, I feel the need to insert some sanity, seek out meaning and secure some level of peace for myself and my family. The following list is where I'm starting my thoughtful journey in coming up with reasons for the trappings of the season.

CHRISTMAS COLORS
RED - the blood of Christ
GREEN - the color of money, reminding us that the love of it can be the "root of all evil" and the only time Jesus did anything out of anger was to overturn the tables of the money changers in the temple
WHITE - the color of snow and symbol of Christ's purity...and we say "pure as the driven snow"
BLUE - the color of the sky for Christ came down from heaven and rose up again
SILVER - for the 30 pieces of silver paid to Judas for his betrayal of Jesus
GOLD - for the streets of heaven and the gift of one of the wise men to the infant, Jesus

CHRISTMAS DECORATIONS
TREE - an evergreen to represent everlasting life
LIGHTS ON THE TREE - represent the stars in the night sky
ANGELS - for the angels who brought glad tidings to the shepherds
ROUND ORNAMENTS - for all the planets God created and hung in the sky to circle the stars

TEARDROP ORNAMENTS - for the drops of water at baptism

BELLS - for the bell that rings out to guide lost sheep back to the fold
DOVES - for the Holy Spirit

FRUIT - for the fruits of the spirit
GRAPES - for the blood of Christ in the Holy Sacrament

WHEAT - for the bread which is the body of Christ in the Holy Sacrament

CANDY CANES -
shaped like a shepherds staff ( in a "J" for Jesus) and colored for his blood and purity
CANDLES - for light as Jesus is the "light of the world"
RIBBONS & BOWS - remind us that we are bou
nd together in Christian love, like the old hymn..."Blest be the tie that binds our hearts in Christian love..."
GIFTS - because the wise men brought gifts to the infant Jesus...because Jesus taught that giving is a way of showing love...in fact, the Hebrew letters that spell the word "love" in Hebrew translate independently as "I" "GIVE"...and because God gave His son as a sacrifice for us and continues to give us His gift of Grace.

SWEET TREATS AND FEAST - as a manner of celebration

A silly note: I like the convenience of an artificial tree but wish in my heart it was real, so I created a bit of an illusion by standing a piece of firewood at the base to cover up the totally obnoxious POLE that looks nothing like a tree trunk. Worked great, don't you think?

I wish you and yours the very merriest Christmas, filled with family and love and continued blessings.

Monday, November 29, 2010

THANKSGIVING - Without Food Photos

I've seen about all the pictures of perfect turkeys and displays of food that I need for a while, so I thought I'd get past the tummy filling treats and party planning and cut to the really important aspects of our 2010 Thanksgiving celebration.
It started with cooling weather and falling leaves.
There was silliness and excitement as family came in from out of town
and the energy of children playing in the autumn air
and little ones gathering leaves into piles for play.
It included Aunts and Uncles and Mothers and Fathers and Grandparents taking pictures of memories in the making and ended with sweet goodbyes and a little help getting ready for the greatest celebration of the year - Christmas.
I learned something this Thanksgiving, proving that you're never too old to learn. I learned to let go. I learned that stress is actually a choice we make, and this year, I chose not to invite it. I actually took my cues from the children who were eager to simply enjoy.

By keeping decorations simple and asking some of the family to bring side dishes, I was able to concentrate on the birds and major items and the timing. Not one but two turkeys came out perfectly - tender and moist and as pretty as any picture you've ever seen. (I used the old standby, Reynolds Wrap "tenting" method which has never failed me.) By setting up a self-serve buffet, we managed to properly seat and feed 23 people comfortably and efficiently in my small space.

Ahhhh, by the way, I had a seating idea that might be worth passing along. With smaller children seated at by and girl tables and adults to be seated at a collection of card tables, I wanted to mix it up a bit to avoid teens isolating themselves and timid adults clinging quietly to their partners. So, the tables were numbered and place cards were handed out to each guest. Then the guests were asked to withdraw a numbered bean from a bowl. The beans were prepared with glue dots on the back so they could be attached to the place cards which the guests put on the appropriate tables. The combinations worked out wonderfully well. Some husbands and wives were separated. Teens found themselves seated with their elders and some of the less vocal guests found themselves at tables filled with lively conversation. It was a process that I will definitely use again.

The success of this Thanksgiving gathering has started me rethinking some things that have gone without thought for far too long. Christmas is one of them. I've dealt with somewhat austere holidays in the past. Perhaps that's the reason that I've gone overboard in one area or another for many years. One of my most stressful categories has been that of decorating. I've accumulated enough decorations to overdo every room in the house. Generally, I take my time and enjoy putting them up but always dread taking them down and packing them away. I spent some time reflecting on the Christmases of my childhood. There was simplicity coupled with absolute wonder and I wonder where all that magic has gone. It seems to me that as the piles of goodies under the tree grew larger and larger, the appreciation, joy and peace of the season grew smaller and smaller. This year, I'm going to try to reverse the situation and will share my success or failure with you throughout the month.