Showing posts with label Furnishings. Show all posts

Saturday, January 5, 2013

Day 29 - 'Love' on Barnboard

I've had these two, 28" pieces of old, barn wood for a very long time and have always known exactly what I wanted to do with them.  
Somewhere in the wee hours of last night, long after Hubs had turned in, I pulled out paint and brushes and set to work.  The painting was the fun part and a good start.  Now the actual 'work' begins.  There will be sanding and protective coats of poly to apply and more sanding and more poly and hooks to add to the backs.
Eventually, they will be nice pieces of wall art and will end up on our Etsy site.  We've had a shop there for a while.  As usual, it took me ages to get the hang of setting it up but I'm so glad I did.  The little shop gives us an opportunity to play at making things without having to find places to put them.  Right now, the inventory in the shop is a bit depleted because of holiday purchases and I need to spend a day or two with the camera in order to add other items.  The little shop won't make us rich but we are 'still finding cash' as the result of it and the continued activity helps bring enjoyment to our days.

Thursday, June 14, 2012

Shabby Chic - Old, Older & New

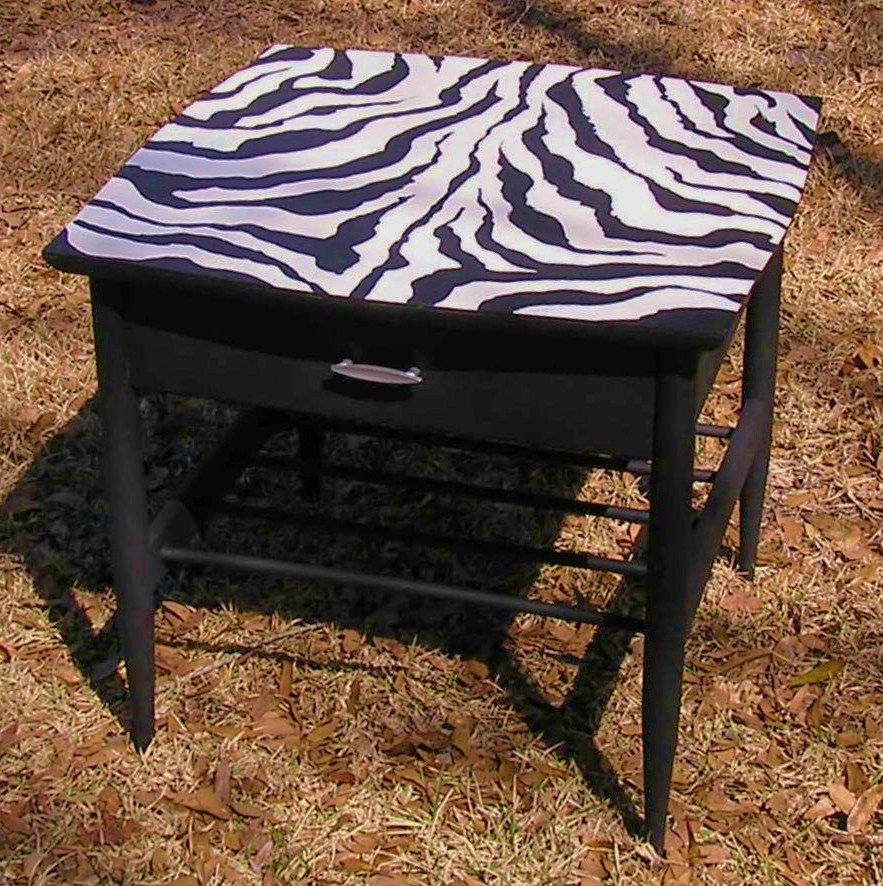
I love my new, little old table.  The look is perfect in my living room for now and the color picks up the slightly aqua blue in some of my paintings.  Eventually, the table will live in my studio...if I ever get that finished.
The table started out like this, a mess of a find at a yard sale that I got for only $3.  Remembering that I had one 18"x18" unpolished marble tile, I immediately measured the top and was excited that it fit - almost.  As you can see, I needed to trim the ends of the table top along with those little "wing" thingys that stuck out from the legs.  No idea shat they were for.  A good washing and a little sanding and it was ready for paint.  I started with a couple coats of white and let them dry well before adding a coat of the blue.  After the blue dried, I began sanding lightly with a coarse paper.  For the most part, I only wanted the white to come through.  Thought in a few places, I sanded more vigorously to bring out some of the underlying brown.  It ended up looking legitimately old and well worn while the seamless marble top gave it a clean, crisp look.
I was inspired to make this rustic, twiggy candle holder by something I saw on a Pinterest board.  I thought it would be a breeze and if I had used hot glue, it might have been.  But I don't like all the glue strings so I went with my old standby, E-6000.  Because it doesn't dry on contact, it took a little longer and the whole project was not as easy as I thought I would be.  Still, I'd do it again because I love the look.  It reminds me of a campfire with the light flickering inside.  Just a fun, rainy day project and the cost was $0.
This is another Pinterest inspired adventure.  In case you don't recognize the location, it's the toilet tank (just under the lid) and I thought my grand kids would get a kick out of the little critter when they visit in a few weeks.  The one on Pinterest is actually a decal by Decal Village that you can order from the blog "Rare Bird Finds".  Click HERE to link.  I was in too much of a hurry to wait for shipping and only want the little critter in place for a few weeks so I made my own with a strip of electrical tape and a used a white paint pen for the eyes and a black one for the hands and pupils.  It only took a few minutes and it makes me smile every time I enter the room.

Thursday, March 31, 2011

$25 Desk becomes "Shabby Wonderful"

This quite old desk was bought at a yard sale and has kicked around the family for years. Originally mine, I gave it to one daughter when I moved to Alaska. She gave it to another daughter when she changed direction and eventually the desk came back to me when I came back to Florida. Perhaps it was a little worse for the wear, but who could tell. It was dark with age, scratched and dented already. I had tiled the top with 10 cent white wall tiles ages ago to cover the peeling veneer. But it was serviceable and usually confined to a studio or work room.

Eventually, I needed to use it in a more noticeable location and decided to paint it white to go with the tile top. The really outstanding "shabby chic" finish was a complete accident. I forgot to prime the old wood first and it began to bleed unevenly into the white paint as it dried. At first I was downhearted, staring at the need for a much more time consuming job. Then I thought to take some sandpaper to it. The result was classic aging but the crowning touch was realizing that a tin panel piece of my wall art (a $1 yard sale purchase) was the perfect size to provide a privacy panel for the desk. Again, paint on, rub it off, scrub it off, scrape it off. Instant "old". The use of E-6000 glue, and tape to hold the panel in place while it cured, and I was in business. This was one of the easiest furniture projects I've ever done and the result is that an antique dealer recently offered me $300 for it. No sale. It may have started out as a make-do project that went awry but it ended up being one of my favorite pieces.

Monday, February 21, 2011

Easy Homemade Oil Lamps

Never buy candles again.With spring approaching, our thoughts turn to reclaiming our yard, planning a garden and the hurricane season. Normally I stock a supply of candles and wince at the cost, wishing I had more oil lamps. I don't know why but I suddenly remembered that my mother used to make them in mason jars. So, I thought I'd do some experimenting and go for "pretty" while I was at it.

1- Use 100% cotton wick material...a strip of cotton fabric or twine will do. I used cotton "filler cord" from the fabric department, 10 yards for $2.29. That's a lot of wick! 2- cut your pieces (6" to 12" long) and soak them in water. Shake off the excess and cover them with salt for several hours so they will burn slower and longer. Remove the salt and let the wicks dry.

3- Select your containers. I chose a candle glass, a sea shell and a little vase I made years ago. 4- You will need wire to stabilize the wick. I used 18 gauge "bright" floral stem wire, 18" long.
5- The purpose of the wire is to hold the wick either up from the bottom of the container or down from the top. So, fashion it accordingly. One thing I learned is that the only part of the wick you want exposed to the air is the 1/4" above the wire that you will light. You will see that I made a small metal sleeve to surround the wick in the little vase. I should have done that with the sea shell and I did coil extra wire around the descending wick in the glass.

6- Test the positioning of your wires in the containers and when you are satisfied, thread the wick through and crimp the wire snugly around the wick. You want it to to be tight but still allow you to pull the wick up once it has burned down.
Use only olive oil as it will not smoke, doesn't smell and, amazingly, it will not burn. You cannot set it on fire - go figure! In fact, if you have fashioned your wire to hang from the rim of your container, you can simply dunk the flame into the oil to put it out. I would suggest covering the lamps with plastic wrap and a rubber band when not in use to keep the oil from evaporating. I'm going to try infusing lavender in some of my oil to see if I will get that wonderful fragrance.
Also, I found this site (LINK) that gives instruction for making the type of clay oil lamps used by the ancients. You might enjoy it. I'm going to give it a try.

I have a party to plan for the weekend and will post the highlights.

Monday, February 7, 2011

Making a Unique Child's Shelf Unit

I've been trying so hard to think Spring into existence but it isn't working. These arctic fronts just keep rolling in. I thought getting down to 29 overnight again was something to grumble about until I spoke with my Alaska daughter today. She reported the noontime temperature at -4. Brrr. It reminded me that I only need to be patient a couple of weeks longer while Alaska won't see Spring until late May. I can hardly believe that I used to consider that "normal". But Alaska winters provided tons of time for projects.

Then I remembered this little shelf unit for toys that I made for one of her children and thought you might enjoy the simplicity of it. The construction is so very simple and the materials list consists only of
  • 2 - 1" x 12" x 8' boards,
  • 1 - 1" x 2" x 8' board and
  • a bundle of survey stakes.
  • The few shingles (only 24) can usually be obtained without charge from a construction site with a polite request and a smile.
  • A couple of hinges, a little paint and you're in business.
INSTRUCTIONS:
Cut one of the 1" x 12" boards in half (= 2 boards @ 4' long each) for the sides.
Miter one end of each of these boards at a 45 degree angle so the roof will fit snugly.

From the second 1" x 12" board, cut 5 shelves at 12" long each.
The remaining 3" (more or less) should be cut almost in half for the roof.
(You will need to take into account the thickness of the board as one piece will overlap the other when they are attached to each other at the roof ridge. The idea is for both sides of the roof to be the same length. Trim one if necessary.)

Mark your shelf locations and glue and screw them into place.

Glue and screw the roof boards into place.

Paint the entire assembly.
FOR THE PICKET FENCE:
First, paint all your pickets.
If I remember correctly, I shortened the survey stakes a bit so that they would come just above a shelf edge. From the 1" x 2" board, four pieces are cut a little longer than the survey stakes so that they provide four legs at the corners. The 1" x 2" pieces are trimmed to points at the top end to match the pickets and are glued and screwed into place. Along the sides, between the 1" x 2"s', I painted two horizontal stripes white to simulate the horizontal boards of a fence. The pickets are then glued into position on top of the horizontal stripes. The same general spacing is used for the gate and the vertical pickets are glued and tacked to actual horizontal pieces made from two additional survey stakes.
Add hardware and shingles and you're done. Isn't it cute?

Sunday, July 5, 2009

Table Rescue


This unique, stylish and personalized table which now resides in a family den, began life as simple discard. Details of its rescue can be found at this link.


With the final finish of several coats of non-yellowing polyurethane, a family heirloom was born.

Saturday, June 20, 2009

A $3 Side Table

I wish I'd taken a picture of this table before I refinished it. It had good Danish Modern lines but was so surface worn and distressed that the $10 yard sale price had been reduced to $5 and my offer of $3 was gladly accepted.
When I think of refinishing furniture, my head almost explodes remembering the long, labor intensive, tedious process of stripping paint and finishes...undertakings of my more energetic youth. Now, I search for the easiest and fastest route to revitalizing things that are genuinely worthy of the trash heap.

This table took a quick coat of black paint with a very small bit of sanding and white paint on the top. The zebra pattern was not artistic genius, just a quick computer search for a general idea and a matter of painting black lines on the white top. I didn't even have to pencil the pattern in advance. A little silver "Rub n' Buff" on the old brass drawer handle and the little table was ready to enter the 21st century.

Sunday, May 31, 2009

Table Rescue - Details

This 36” table was just the right size and style for Jill. The problem was that Jill is a very classy woman with impeccable taste and the table was not only old but in horrible condition; not just the finish but bits of veneer were curling or flaked away, and someone’s probably beloved pet had obviously used a corner of the base for a chew toy.

Still, Jill’s family was in the process of downsizing and extreme belt tightening and relocating to a much smaller home.
She needed a smaller table and the $10 yard sale price tag was more than she could resist.

We decided not to try to camouflage the flaws but to celebrate the age and wear by treating the table as a family heirloom.With so little original finish remaining, it was not necessary to sand the surface. It was wiped down well and painted flat black with a brush, being careful not to get paint in dents and dings and chew marks – as if the obviously aged damage had been done after the table acquired its black finish.


Next, the names of grandchildren were computer printed, as large as possible.
The pages of names were cut into strips with one name centered on each strip.

Guidelines were drawn in chalk and the name strips were placed and adjusted to be equal distances apart.
Tiny pieces of tape marked the spaces between the names. Then each name was written between the tape markers using a white paint pen.

Finally, paint dots were centered between the names.
The writing was aged by going over the white lines with a small brush and water-thinned brown craft acrylic and lightly splattered with the flat black.