
 I've been trying so hard to think Spring into existence but it isn't working. These arctic fronts just keep rolling in. I thought getting down to 29 overnight again was something to grumble about until I spoke with my Alaska daughter today. She reported the noontime temperature at -4. Brrr. It reminded me that I only need to be patient a couple of weeks longer while Alaska won't see Spring until late May. I can hardly believe that I used to consider that "normal". But Alaska winters provided tons of time for projects.
Then I remembered this little shelf unit for toys that I made for one of her children and thought you might enjoy the simplicity of it. The construction is so very simple and the materials list consists only of
- 2 - 1" x 12" x 8' boards,
- 1 - 1" x 2" x 8' board and
- a bundle of survey stakes.
- The few shingles (only 24) can usually be obtained without charge from a construction site with a polite request and a smile.
- A couple of hinges, a little paint and you're in business.
INSTRUCTIONS:
Cut one of the 1" x 12" boards in half (= 2 boards @ 4' long each) for the sides.
Miter one end of each of these boards at a 45 degree angle so the roof will fit snugly.
From the second 1" x 12" board, cut 5 shelves at 12" long each.
The remaining 3" (more or less) should be cut almost in half for the roof.
(You will need to take into account the thickness of the board as one piece will overlap the other when they are attached to each other at the roof ridge. The idea is for both sides of the roof to be the same length. Trim one if necessary.)
Mark your shelf locations and glue and screw them into place.
Glue and screw the roof boards into place.
Paint the entire assembly.
 FOR THE PICKET FENCE:
First, paint all your pickets.
If I remember correctly, I shortened the survey stakes a bit so that they would come just above a shelf edge. From the 1" x 2" board, four pieces are cut a little longer than the survey stakes so that they provide four legs at the corners. The 1" x 2" pieces are trimmed to points at the top end to match the pickets and are glued and screwed into place. Along the sides, between the 1" x 2"s', I painted two horizontal stripes white to simulate the horizontal boards of a fence. The pickets are then glued into position on top of the horizontal stripes. The same general spacing is used for the gate and the vertical pickets are glued and tacked to actual horizontal pieces made from two additional survey stakes.
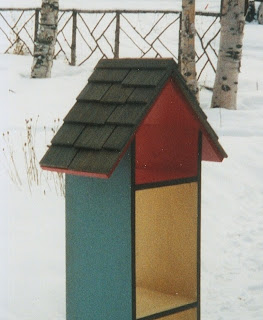 Add hardware and shingles and you're done. Isn't it cute?


+-+Copy.JPG)
No comments:
Post a Comment