 |
| All set for Summer! |
Sunday, June 3, 2012
Save $$ & Have Fun Summer Shopping for Kids
Wednesday, July 14, 2010
Afternoon Fun for 33 cents
 It could be swirled around you, low at your feet or over your head, like a cowboy's rope. You could swing it to make huge, fluttering figure eights or run, fanning your arm up and down as you went so that it looked like you were being chased by a Chinese dragon, and the taut rubber on the wire, hummed and whistled in the wind.

The photo on the right should be self explanatory...a length of shaped wire, with rubber band, a string, and cardboard folded around the wire with the end of a streamer stapled inside. The measurements are non-specific. The cardboard is a little wider than the streamer. The bend of the coathanger is a little wider than the cardboard. The string is about the length of the distance between a child's hand and the ground and the streamers are 6-7 feet long for younger children and 10-14 feet long for older children.
If you have found these in the store or have a better configuration, please let me know.
Monday, July 5, 2010
Child Friendly T-shirt painting
 Several painting techniques are extremely easy for children. The potato print is one.
  We used a cookie cutter to establish our shape, sinking it deep enough into the potato half to give us a metal "stop" when cutting away the excess.
  A plastic place mat is perfect for inserting into the shirt to keep the paint from soaking through to the back of the shirt. A smooth surface mat will provide a truer impression.
  We used a textured mat for dimension.
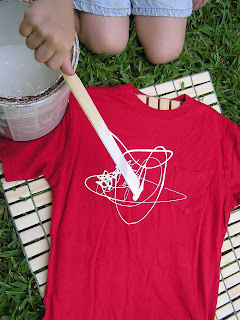
 Simply letting paint drizzle from the end of a stir stick produces instant modern art.
 Using a foam brush to apply paint to a sea sponge allows the children to cover a large area at a time
  without gobbing on the paint and
  the foam brush is an easy applicator for painting directly
  and painters tape provides a general guide.
Wednesday, July 22, 2009
SIMPLE SUMMER
 If you have younger children, you simply must click HERE for a link to one of the most wonderful posts I've ever seen on a blog. My words are completely inadequate when compared to this young mother who has discovered magic moments with her children in a week of sheer simplicity.
Sunday, July 5, 2009
100 FREE: Activities for Children
 If a tight budget has you at a loss for something special to do with the children this summer, check out this fantastic list. Here is a link to, not dozens but, an actual one-hundred creative activities that are absolutely, 100% FREE.
Spring - When Children Bloom
As I’ve already said, I give 4 of my grandchildren art lessons once a week. I started with the oldest, a year or so ago, and decided to add her two little brothers this year. As winter began to fade, I felt bad about leaving the little one out and invited her to join us. I was thoroughly prepared for fidgeting and boredom and paint in places that paint should not be. However, I was not prepared for her light, gentle handling of the brush or her innate understanding of washes or her ability to transcend the literal.
A few weeks ago, taking out lessons to the deck, I asked for definitions of spring. Having been given ample answers covering new growth and warmth, I asked what spring smelled like, felt like and what impressions of those senses would look like. Asking the children to paint, not “things” but feelings and impressions, 3 hesitated but the little one went right to work. I would like to share some of those impressions with you.
This is her
rendering of
“Night Sky
with Moon”.
Link to the children's Mercy & Truth Necklace project.
Sunday, May 31, 2009
Budget Friendly Summer Activities for Kids

I will be posting explanations, instructions, plans and recipes for the following children's activities over the next few weeks. Some are new twists on old things. Some are just old things. In fact, some are so old I did them when I was a child. "Sling the Statue" and "Kick the Can" are two such outdoor activity and favorites on my block in the 1950's. I hope to be able to do this for each season.
Sidewalk chalk & hop scotch – Sand castles on tarp w/ hose – Ice sliding on tarp – Jump rope (tying off one end) – Landscape timber balance beam – Tether ball – Pool full of balls – Pool full of bubbles – Bean Tent sandbox: Plans – Streamer/Flyer: Instructions – Making kite tails – Kite flying – Bubble Recipe – Slime Recipe – Treasure Rocks: Recipe - Mud puddle & pies – Making Boats out of paint stirrers – Pinwheels - Shower curtains for stage play – Make a Piñata – Painting Rocks for rock garden – Leaf Babies – Make a Secret Garden – Limbo – Squirt-painting an old, hanging sheet – Sack races – Wheelbarrow Races – Head to Toe: partnership rolling – Lock Arms: stand n’ sit – Royal Chair – Duck, Duck, Goose – Red Light, Green Light – Kick the Can – Flashlight Tag – Sling the Statue – Button, Button, Who’s Got the Button – Musical Chairs – Simon Says – Mother May I? – Library – Berry Picking – Local free park w/ ice cream ball
Thursday, May 28, 2009
Mercy & Truth - nature appreciation necklaces

WE CALL IT ART CLASS BUT...
it's really an excuse to spend time with grandchildren.
I purchased Sculpey brand clay for the children to make Mother's Day gifts and they enjoyed it so much that I thought we'd try another project. I remembered seeing a "Dinosaur Art Project" making "Fossil Casts" on one of my favorite blogs - "that artist woman". Tailoring her basic idea to our materials and tying the entire project to our current topics, the children and I had a
good time, shared a bit of adventure, brought their recent Bible Study into play and ended up with necklaces for each of them.
Materials included: Sculpey clay, a drinking straw, acrylic craft paint & brushes, colored magazine pages, white glue, large jump rings and le

 ather laces.
After rolling their clay into balls about the size of a small egg and pressing them flat to about 1/4" thick, we went for a Nature walk to find twigs and rigid leaves for making impressions.

The children used a piece of a drinking straw to punch out holes for hanging. The clay clogged one end of the straw with the first punch so we used the other end for the second punch. As the trapped air forced the first clay plug out of the end of the straw, I thought it would be a good time to teach about displacement so I asked if any of them knew why the first clay popped out as they plugged the second end. Without hesitation, the 6 year old replied, "air pressure" and the 8 year old chimed in to quickly give me a lesson in physics. I was impressed...Oh, did I fail to mention that the children are home-schooled? (continued - link here)
Mercy & Truth - necklaces - Part 2


After baking the clay to harden it, the pendants were painted and the excess wiped away.
The children's recent Bible Study - Proverbs 3:3 - was a natural for inclusion into this project. "Let not mercy and truth forsake thee: bind them around thy neck; write them upon the table of thine heart:"
Long tapered, triangle strips of magazine pictures were cut out, 2 for each necklace and the children wrote 'Mercy' on one and 'Truth' on the other. The papers were then spread with white glue and wrapped around drinking straws, beginning with the large end, to make beads. The straws were cut to fit.
I sprayed the beads with gloss acrylic and the pendants with matte acrylic and added the jump rings.


