Eventually, I needed to use it in a more noticeable location and decided to paint it white to go with the tile top. The really outstanding "shabby chic" finish was a complete accident. I forgot to prime the old wood first and it began to bleed unevenly into the white paint as it dried. At first I was downhearted, staring at the need for a much more time consuming job. Then I thought to take some sandpaper to it. The result was classic aging but the crowning touch was realizing that a tin panel piece of my wall art (a $1 yard sale purchase) was the perfect size to provide a privacy panel for the desk. Again, paint on, rub it off, scrub it off, scrape it off. Instant "old". The use of E-6000 glue, and tape to hold the panel in place while it cured, and I was in business. This was one of the easiest furniture projects I've ever done and the result is that an antique dealer recently offered me $300 for it. No sale. It may have started out as a make-do project that went awry but it ended up being one of my favorite pieces.
Thursday, March 31, 2011
$25 Desk becomes "Shabby Wonderful"
Eventually, I needed to use it in a more noticeable location and decided to paint it white to go with the tile top. The really outstanding "shabby chic" finish was a complete accident. I forgot to prime the old wood first and it began to bleed unevenly into the white paint as it dried. At first I was downhearted, staring at the need for a much more time consuming job. Then I thought to take some sandpaper to it. The result was classic aging but the crowning touch was realizing that a tin panel piece of my wall art (a $1 yard sale purchase) was the perfect size to provide a privacy panel for the desk. Again, paint on, rub it off, scrub it off, scrape it off. Instant "old". The use of E-6000 glue, and tape to hold the panel in place while it cured, and I was in business. This was one of the easiest furniture projects I've ever done and the result is that an antique dealer recently offered me $300 for it. No sale. It may have started out as a make-do project that went awry but it ended up being one of my favorite pieces.
Monday, March 28, 2011
Springtime Calls for Aprons
Spring makes me smile. Whether this time of year has us looking forward to spring blossoms or spring cleaning or getting a vegetable garden started with thoughts of fresh vegetables on the table or jars of fresh-canned goodness growing in numbers on our pantry shelves, spring seems to bring us home to a simpler time and to our roots. And, what takes us back to simpler times faster than putting on an apron. I remember my mother's Hostess Aprons and my grandmother's kitchen apron. I have an apron for painting and have made my children and grandchildren Crayon aprons. There's something about being 'dressed for the occasion' even if the occasion is getting down on hands and knees and dirty in the soil of a garden. Aprons also make great, unique gifts - tucked in a tote of bar-b-q utensils or a housewarming bucket of cleaning supplies. One of my favorite websites is Amelia's Aprons, featuring handmade creations from the Edwardian style to the little pocketed garden apron I've shown here. Take a look. You just might find something to make you smile, too.
Make Old Candles New Again - FREE
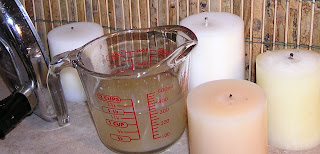
With the iron set half way between the coolest and hottest settings (between Silk and Wool on this iron) hold it upside down, vertically over a Pyrex measuring cup. Holding the ugly end of the candle to the iron doesn't require pressure. It begins to melt immediately at just the right speed. There is no smoke, nothing to be anxious about, just a steady stream of melted wax sliding off the tip of the iron. It worked like a charm. So easy and so logical.
The end result was four candles as useful as the day they were purchased AND I ended up with 1 1/4 cups of perfectly reusable candle wax which I will feature in an upcoming post.
Pinch the brittle, burned part of the wick off before you start. When the wax is melted down far enough to reveal 1/4" of wick, you can stop (as I did) or you can melt it down a bit farther to snip the darkened tip off the wick. Also, since the wax in the measuring cup is already melted, you will be able to pour it immediately into candle molds or just into a different container for storage. I prefer to let it harden, microwave it for a few seconds, to release it from the edges, so I can save it in the shape of the measuring cup that I will use for melting it later. Also, any solids, bits of dust, burned wick pieces or soot, will settle to the bottom of the undisturbed measuring cup and can be scraped away, .once the solid wax is turned out, leaving some pretty nice wax for future use.
I hope you search for an old iron and give this a try. It really was so fast and easy and is a true money saver.
Saturday, March 26, 2011
Keeping Squirrels Out of Plants - UGH!
Wednesday, March 23, 2011
Brick Path Destination
A TREE GOT IN THE WAY!
With the little brick path detour neatly heading in the direction of my future studio and the studio yard somewhat defined, we set about establishing corners and laying blocks in anticipation of a building project in the not too distant future...my long awaited, little, garden studio.
That's about the time we noticed the long split in the trunk of a seemingly thriving but lightning-struck tree that was leaning precariously over my would-be roof. I thought the tree would be fine since it held a full display of new spring leaves. Fortunately I was overruled.
My husband had hardly begun to cut when, in an instant, the tree snapped and hit the ground. How there was life left in that tree, I will never know because, as you can see, it was hollow to the root...an accident waiting for a wind.
YEP! THE CAYENNE PEPPER WORKS LIKE A CHARM.
Tuesday, March 22, 2011
Brick Path Extention
To access the "how-to" post about building the brick and gravel path, click HERE.
Monday, March 7, 2011
Ingredients for a Successful Party...
Family, Friends, Food & Love.
Having two children with February births, exactly 51 weeks apart, has recently developed into a joint celebration. Though I kept them separate through their childhood years, they don't seem to mind sharing the occasion now that they are grown and have children of their own. The only snag being that our long-time family tradition has been to prepare the most favorite meal for the guest of honor. That resulted in a double meal of Shish Ke-Bab and ham with sweet potatoes. I tried a Sweet Potato Salad and you will find the recipe HERE. It was a great hit.
So, the party and the pictures and the passing of a family member has set me to thinking...I began this blog in an attempt to inspire and encourage others who, much like me, must make do with less than we'd like from time to time. It's curious to me that through all the ups and downs of my life, I've never thought of my self as unfortunate. I suppose it is that being blessed with the richness of family and friends and loyalty and love, I have never thought of myself as poor, even when I have been. Now, the weak economy in so many parts of world has some of us concerned and finds some of us struggling...
and I have an idea...
for years, I've wanted a studio and for years it hasn't happened. THIS YEAR I intend to see it built, not as some grand extension of our home but as a simple out building with the advantage of allowing us to live in it, "off the grid", if need be. In a few days, I'll post my drawings and will update my progress regularly so you can see where it is that my "almost free" garden path leads.
Subscribe to:
Posts (Atom)