Tuesday, November 19, 2013

The Simple Side of Decorating for Fall

As much as Autumn decorating is about warm colors, the season is about the warmth of family and friends - the warmth of getting settled in for the chilly winter ahead and the holiday celebrations that are sprinkled throughout the cold.

When I was younger, this was a hectic time - from back-to-school through Halloween and into Thanksgiving and right into the Christmas Season.  By the time January rolled around, I would have exhausted myself, my budget, my patience and my sense of humor.  No wonder January always seemed so bleak!

Now, older and wiser, I decorate with very little: a handful of colorful leaves, a few twigs, a basket of real fruit (good for decor and eating, both), some pine cones from the yard, some Holly sprigs from the hedge.

I don't have to pack away the things that normally fill my home (and I don't have to drag them back out again).

It seems that I have been creeping stealthily in this "minimalist" direction for several years without recognizing  it as a conscious direction at all.  Now that I have arrived, I am thrilled.  It's like "...summertime and the livin' is easy."  I love the way the low, morning sun illuminates the little cluster of Autumn leaves (above) and the fuzzy, warm blanket waiting on the couch.  The aromas of Cinnamon and Cloves rising up from an afternoon cup of Hot Russian Tea (recipe below) reminds me of the times when Autumn arrived with the hectic whirlwind which was a family of eight children.  I miss them.  I miss them not.  They are still with me in so many ways.

They are in every seasonal memory that wanders through my mind.  And they are on the other end of almost every phone call that I get.  They tell me of their preparations and their children's delight and expectations.  They also tell me of their exhaustion and I giggle to myself.  "Take it easy", I say, knowing full well that they won't.  But I know, just as well, that the time will come when they, like me before them, will conclude that less really is more - just as warm and just as welcoming of the chilly winter ahead.

Cold Weather - Hot Russian Tea

Call it Hot Russian Tea or Tang Tea, my kids and I have enjoyed this steamy, aromatic drink since I first heard of it in the 70's. If you've never had it, give it a try. If you haven't had it in ages, now's the time to revisit a bit of the past. Make it for yourself or package it for gifts. I found some pretty little canisters but a jar with a decorated lid works just as well for gift giving.
HOT RUSSIAN TEA
Mix all ingredients together in a very large bowl. Use 1 or 2 heaping spoonfuls per cup of hot water. Inhale, sip and enjoy.

3 cups Sugar
19 oz. container of Lemonade Mix
20 oz. jar of Tang
3 oz. jar or unsweetened Instant Tea
2 Tbsp ground Cinnamon
1 tsp each of ground Cloves and Ginger

Fall: Decor Made Easy

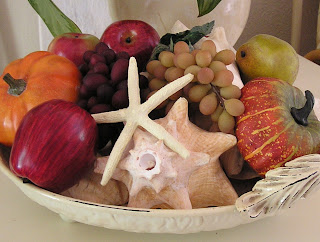
Decorating for the seasons doesn't necessarily require that we pack away everything that personalizes our home most of the year. After living in Alaska for 13 years, I was so thrilled to return to my home Florida, that my home almost immediately became a collection site for all things "beach". The Gathering Bowl of shells in the living room is one of my favorite things and there was always a bit of regret associated with replacing it with season appropriate decor. Last Christmas I flatly refused to banish it through the winter and tucked bright, shiny Christmas ornaments in among the shells. This fall, I expanded that idea, tore apart the cornucopia that had become an unimaginative yawner and added the plenteous harvest to my precious shells.

I love the look and hope you find ways to incorporate a bit of the "season of the moment" without depriving yourselves of the company of items you truly enjoy.

There is very little new here...4 mums bought early and small @ $2.50 each. Most of the items on my shelf/table were there through the summer and have only been tweaked for Autumn by the addition of the old table runner, a stem of autumn leaves added to the greenery and free pine cones mixed with old artificial gourds set in a rustic ceramic serving tray that was a 50 cent yard sale find years ago. The result is a statement of color and texture acknowledging that we are at least aware and appreciative of the change in seasons.


Monday, October 28, 2013

Homemade Halloween Costume Ideas

Holidays from now through Valentines Day can be a time of fun and joy and making memories or they can be the source of incredible stress. I am trying to relax, rethink priorities and enjoy these special times for our families regardless of our economic situations. When I grew up, half a hundred years ago, all costumes were homemade. All treats came from someone's kitchen or from their harvest. I honestly believe we enjoyed life more. I know the memories are sweet and worth sharing with grandchildren.

Please search your memory for costume ideas that cost little or nothing and share them here, through your comments. Thank you.

Grown-ups and babies need not be excluded from Halloween dress-up fun. Thing 1 and Thing 2 required only wigs, long johns, red socks on hands & feet and imagination (and quite a bit of stuffing).

The prize winning baby flower began as a green hoodie and sweatpants. The petals, made of pink felt costing only pennies and were embellished with rhinestones from a discarded pageant dress.


If you have a tambourine lying around the house, some old curtain sheers and Christmas tree icicles, you have the makings of a dancer.
A plain gray skirt, white blouse, a very simply made white apron and some white paper for a collar and cap and your little Pilgrim girl is ready to go.
Some angels don't even need wings. A little gold garland for a halo and a tie around the waist and no one could refuse treats to this one.

However, if wings are requested or required, remember that wire coat hangers make perfect frames for a covering of tulle or curtain sheer fabric. Angel wings are a single piece, while fairy wings each have two parts.


And...angels are never too small. This is my first grandchild, 20+ years ago, dressed in a teenage aunt's petticoat pinned under her little white, hooded sweater. Coat hangers and aluminum foil provided the wings and halo. Cost - $0. Memories - priceless!

Sometimes we only need to work with what we have. A little girl with very long hair almost instantly, and certainly economically, becomes Pippy Longstockings. The hair was gathered into two pony tails. Then the center of a straightened, wire coat hanger was shaped across the top of the head, like a croquet wicket and each end was threaded down through the pony holders on each side. The hair was then braided around the wire; the braids secured at the ends and the wire bent up and out. A few exaggerated freckles and with a look like this, the rest of the outfit hardly matters...but it is an easy look to duplicate.


This cute, cute (and prize winning) dinosaur costume requires no pattern at all. A green hoodie and sweat pants provide the base with fabric from a second pair of pants used for footies and mittens. The gold colored chest, knee patches and identifying dinosaur "plates" are felt.

The little white cat is made of fabric from a fuzzy thrift store bathrobe. Notice the piece of monofilament line attached from the end of the tail to the back of the neck to keep the tail lifted when "kitty" is upright. The nose is a triangle of pink felt attached by fine elastic that goes around the head. It has momofiliment "whiskers" hot glued in place.

The baby chick emerging from a cracked shell is about as adorable as a toddler costume gets. In trying to locate a pattern for this little chick, I came across a different approach to the same idea that you might enjoy seeing. Click HERE for the link. The bat and spider costumes were amazingly simple to construct with a black hoodie or sweatshirt and black sweat pants as a basis. The spider legs are connected to each other at the tips with black yarn so that they move up and down with the child's arms. The additional black fabric used for the ears, bat wings and spider legs and the red and blue fabric pieces on chest and tummy were all bargain priced on a remnant table.
NOTE: Another source for incredibly inexpensive fabric is the neighborhood thrift store during a clothing "bag sale".

Combine sewing skills with imagination to delight your child and everyone else. Copy your child's favorite stuffed animal. A little inspection will let you know how many pieces are needed and what shape they should be. With the cooperation of a child willing to lie down on freezer wrap while a rough pattern was drawn, this Tigger, made completely of felt with the stripes simply painted on, became an instant Halloween favorite.

Imagination jumped into high gear with the pretty yellow dress that is so much more. If you are familiar with Beauty and the Beast, you well know Bell & Chip, the tea cup. This dress has a large hoola-hoop sewn into the hem and a small hoop sewn in the hem of a shorter under-skirt. The wearer can grab the hoop at the hem of the long skirt, lift it over her head and "taa-daa", Bell becomes Chip, the teacup.

One little girl not only wanted to be Raggedy Ann, she wanted to be sitting in a rocking chair just like the doll that had been in her room as long as she could remember. Fortunately the request was made months in advance giving the creative mother plenty of time to strategize. The chair is made of styrofoam, duct tape and black paint and is attached to a simple, long, black skirt. The wig is made of red yarn, of course, and the outfit - sewn by Mommy.

I know there are a hundred ideas out there. PLease share them through your comments.

Wednesday, September 18, 2013

Ah, Lovely Fall!

 How nice it is to feel the breeze through open windows again, to see sun shadows crawling down from the ceilings and painting leaf patterns low on the walls.  
Soon the grass will be cut for the last time and the lawn will be littered with leaves.
Something in me begins to relax and something else agitates with anticipation.  Warm colors and thoughts of comfort food lessen the drudgery of packing away summer toys and preparing to turn indoors for a season.
(1) PERFECT WHITE BEAN SOUP
This year, unlike others, I look forward to saying goodbye, at least for a while, to minor medical problems that seem to have taken the luster from the past several months.  Tomorrow, if all goes well, and I'm sure it will, I'll begin my journey back to the enjoyment of life.  
(2) QUICK PUMPKIN SPICE DESSERT
My intention is to flood the blog with warmth and wonderment through the coming holidays.  In the meantime, I'm bringing back some original postings for those who might have missed them in years past.  Enjoy.  Wish me luck.  And plan your own autumn regeneration.
(3) HOT RUSSIAN TEA


1-  Perfect White Bean Soup
1 lb. Dry White Beans (cover with water and soak overnight)
1 Ham Bone
3 Onions - coarsely chopped
1/2 bunch of Celery - finely chopped, include leafy tops
1 Tbsp Garlic - minced
1-2 c. Instant Mashed Potatoes
Salt & Pepper - to taste
 

Rinse beans that have soaked overnight. In a large pot, bring beans, ham bone, onions, celery, garlic and 3 quarts of water to a rolling boil. reduce heat and simmer for 3 hours. Remove ham bone and cube the meat. Add the cubed ham back to the pot with enough of the instant mashed potatoes to bring the soup to the consistency (thickness) you would like.

2-  Quick Pumpkin Spice Dessert

Fold together a prepared box of Jell-O Pumpkin Spice Pudding with a container of whipped Topping.  Do not mix too thoroughly so that it maintains a “marbled” appearance. Quickly dip Ginger Snaps, one at a time, in milk and alternate layers with pudding mixture in 9” x 13” dish.  Begin with cookies and end with the pudding mixture.  Chill and serve.

3-  Hot Russian Tea

3 cups Sugar
19 oz. container of Lemonade Mix
20 oz. jar of Tang
3 oz. jar or unsweetened Instant Tea
2 Tbsp ground Cinnamon
1 tsp each of ground Cloves and Ginger
Mix all ingredients together in a very large bowl. Transfer to a suitable, airtight container.  Use 1 or 2 heaping spoonfuls per cup of hot water. Inhale, sip and enjoy.

Saturday, May 18, 2013

It's TOMATO Time Again - Gardening & Canning

These poor little tomato plants sat indoors on my desk for 5 weeks waiting for the weather to make up its mind so I guess it's no wonder that they took off the instant I set them free.  Here's a LINK to the best general growing information that I've found - including what NOT to do.
Here are some links for additional growing tips like using ASPIRIN or planting tomatoes with EGGSHELLS.
I generally start with a fairly well blended soil and add EPSOM SALTS from time to time to help prevent blossom end rot.  So far, as long as the weather has cooperated, I've had very good luck.
I'm hoping for a bumper crop this year so I can get some additional canning done.  I've been far too stingy with my home canned tomatoes from the past couple of seasons.  This year, I intend to re-process the tomatoes from those jars, turning the previously canned tomatoes into tomato sauce or ketchup or something else...haven't quite decided on that yet.  
 In the meantime, here is a LINK to easy, step-by-step tomato canning instructions.

Friday, March 22, 2013

Day 125 - Sourdough Success in a Jiffy

My first loaves of Sourdough Bread with the new Starter turned out perfectly, just as the ones made for years in Alaska.  But I've past the age or enjoying endless time in the kitchen and have dedicated myself, instead, to figuring as many ways as possible to get out of there as quickly as I can.
Perfect Texture (but cutting should wait until cool)
To that end, I've adjusted my favorite Rustic Bread recipe to accommodate the sourdough.  This is the result and I couldn't be more pleased.  The aroma is incredible, the texture perfect and the best part is that there was no "punching down", no kneading, no second rising; in fact, my kitchen time was reduced to about 5 minutes - the night before and again the morning after.
RUSTIC SOURDOUGH BREAD
(Link for making sourdough 'starter' and sourdough 'batter')
Into a very large glass or plastic container, (pre-warmed with HOT water)...
2 cups Warm Water, 1 pkg Dry Yeast (= 2 Tbsp) and 1 Tbsp Sugar.  
Wait 2 minutes for yeast to "bloom".  
Stir in 1 heaping Tbsp Salt and 1 1/2 cups Sourdough "BATTER".  ADD 6 cups All Purpose Unbleached Flour ALL AT ONCE.
After mixing, this rose almost to the top before beginning to collapse.  Photo shows "morning after" and ready for making loaves.
MIX WELL - Use your hands, if needed, to incorporate dry with wet.
COVER - Use loose fitting lid or plate so dough can "breathe".
LET STAND - At room temperature for 2 to 5 hours until dough has risen and begins to collapse.
REFRIGERATE - Overnight or at least 3 hours.
Cornmeal on baking sheet.
PREP FOR BAKING - DO NOT KNEAD!!!
1-  Liberally sprinkle Corn Meal over baking stone, iron skillet or baking sheet.
2-  Turn refrigerated dough onto floured surface.  Divide in half using serrated knife.
3-  With floured hands, form each half into a ball and "cloak" the dough (Cloaking is gently stretching the top surface of the dough around to the bottom, tucking it under and turning it 1/4 turn as you go.  The correctly shaped final product should be smooth and cohesive.  This process should take only 30 to 60 seconds.)
NEXT:  Set the shaped loaves on the cornmeal-prepared surface and let "rest" for 40 minutes.  
Place empty broiler pan on the oven rack just below the center rack and preheat to oven to 450 degrees.
When loaves have rested and risen, dust the surfaces lightly with flour and slash 1/4" deep with a serrated knife.  
Loaves set to rise for 40 minutes.
Move loaves to center rack of oven and add 10-12 oz. of water to heated broiler pan.  Close door immediately to trap steam.  Bake 30 minutes.  Cool on wire rack.
TIP
To easily gather excess flour from surface, use a paper plate - cut in half.