Monday, December 29, 2014

Easily Restore Used Pillar Candles

After the holidays, many of us are left with ugly, seemingly useless, pillar candles.  
DON'T THROW THEM AWAY! 
An old iron and a few minutes will have them looking new again.
To get started, break off the brittle, blackened wick tips with your fingers.  The thin edges of the candle tops can be cut away in advance with a knife if you like but it isn't really necessary.  The melting process is a quick one.
The old-fashioned iron, (without steam vents) that I picked up at a thrift store for $1, is perfect for this quick task. On a medium setting, halfway between Silk and Wool, hold the iron with the pointed side down so the wax pours off the tip.  Collect it in a heat-safe container like a Pyrex measuring cup. (If you use a regular, steam iron, hold it with the point facing up and let the wax pour off the heel of the iron so it does not get into the steam vents.  Running the iron across a paper towel when finished will remove any wax film and your iron will be just fine.)
Melt the wax down until 1/4" of wick is revealed.  I left the discolored wick tips but you can easily melt a little more wax away and trim the wicks to pristine white.  And there you have it.  The candles are shorter but certainly ready to be used again.

ADDITIONAL THRIFTY NOTE:
Stand used taper candles in an old candle jar and fill around them with the accumulated melted wax.

Thursday, November 6, 2014

Yay - Soup Weather!!!

Inexpensive, hearty, healthy, comfort food for the cold weather.  Pair with fresh-baked bread and mealtime suddenly becomes something memories will be made of.

Perfect White Bean Soup

1 lb Dry White Beans  (cover with water and let soak overnight)
1 Ham Bone
3 Onions - coarsely chopped
1/2 bunch Celery - finely chopped including leafy tops
1 Tsp Garlic - minced
1-2 c. Instant Mashed Potatoes (for thickening)
Salt & Pepper - to taste (go a little heavy on the pepper)
Rinse beans that have soaked overnight.  In a large pot, bring beans, ham bone, onions, celery, garlic and 3 quarts of water to a rolling boil.  Reduce heat and simmer for 3 hours.  Remove ham bone and cube the meat.  Add the cubed ham back to the pot with enough of the instant mashed potatoes to bring the soup to the consistency (thickness) you prefer.  

QUICK - EASY - BREAD RECIPE TO FOLLOW NEXT WEEK

Friday, October 31, 2014

Jump into Fall

 My apologies for having been away so long.  It was a summer of great sadness for me as my husband was laid to rest.  Now it is time to change as the seasons do, to take a deep breath and......
JUMP INTO FALL!!!
With Three Popcorn Ball Recipes

There's something warm and wonderful about gathering in the kitchen with children anxious for the sweet treat that will soon be shared.  Even if the children show up later, knowing that we 'made' something for them is special. 
These recipes are from family members collected long, long ago. In each case,  the recipe has a twist 
(which may be omitted).
This first one, my Grandmother's, is the oldest.  The worms, mixed in and sprinkled on are a just-for-fun addition.
..................................... 
 Recipe #1


Muddy, Wormy Popcorn Balls
1/2 c Molasses
1/2 c. Corn Syrup
2 tsp Vinegar
1 Tbsp Butter
5 - 6 cups Salted Popped Corn (1 Microwave Bag)
1 bag of Gummy Worms

Combine first 3 ingredients in pan over medium heat. Cook to a brittle but not crack ball stage. Remove from heat. Stir in Butter. Pour over popped corn & stir to coat. Shape into 6 to 8 balls.

Opinion: This was by far the easiest, quickest recipe. I think the flavor is 'old time' perfect. The worms, mixed in and sprinkled on, are a just-for-fun addition, perfect memory makers for an evening of thriller movies with the children.

This second one is more for adult tastes.
..................................... 
Recipe #2
Almond & Raw Sugar Popcorn Balls
2/3 c. Light Corn Syrup
2 c. Raw Cane Sugar
2/3 c. Boiling Water
2 Tbsp Vinegar


Combine the above ingredients in a heavy pan, then add 2 tsp Cream of Tarter
 Boil to soft ball stage. (Notice the rich nutty color from the raw sugar)
Remove from heat. Stir in:
2 tsp Almond Extract
1/8 tsp Baking Soda.

 Pour over 2 bags of Microwave Popcorn (appx. 10 cups) to which 1 cup of Sliced Almonds has been added.Mix and mix and mix well. Butter your hands. Form into balls. Cool on wax paper. Makes 8 large balls.
WARNING: Hot sugar is really, really, really hot. Be careful not to burn yourself.
Opinion: This is my second favorite. Love the way the addition of the baking soda caused the entire mixture to froth up. This may be the reason it coats the corn more easily.

# 3 is Colorful & Fun for the kids
..............................
 
 Recipe # 3

This recipe made more than twice as many popcorn balls. They were slightly smaller than recipe #1 but I think the real difference is that they didn't pack together tightly. The pieces stuck lightly to each other and the resulting balls are significantly lighter in weight and less dense than the first batch. Another difference is that this mixture cooled very quickly making the mixing process a bit more difficult. I had to work very fast.
"O" My Goodness Colorful Popcorn Balls
In a heavy pan with buttered sides, combine the following:
2 c. White Sugar
1 1/2 c. Water
1/2 c. Light corn Syrup
1 tsp. Vinegar

Cook to hard-ball stage. Remove from heat and add:
1 tsp. Vanilla Extract
Pour over 2 bags of freshly popped microwave popcorn (appx. 10 cups*) to which 4 cups of colored cereal has been added. Work as quickly as possible, mixing well to coat. Butter your hands and form into balls. Makes 18.

* If you are using regular popcorn instead of Microwave bags, add 1/2 tsp. SALT to sugar mixture.

Opinion: This recipe was a bit more difficult in the coating process and hardened very quickly. I really struggled with it but it was worth the effort according to the grandchildren.

Saturday, June 7, 2014

How-to Restore Solar Path Lights

If your garden solar lights have stopped lighting your path, don't despair.  They can be rejuvenated.  Some are easier than others.  I've chosen my globe lights (the most difficult to access) to demonstrate the process.  (Wondering if the savings is really worth the labor.)
 Sometimes just a good cleaning of the solar panel on the top will restore light.  Sometimes, they have to be taken apart and cleaned from stem to stern.  The things you will need are: clean soapy water, a wet cloth and a dry cloth, an old toothbrush, a small cross-head screwdriver, and an emery board or fine sandpaper, a bit of time and patience.
Remove the post cover and post to find access to the battery.  Mine had to be unscrewed.

Oh yuk!  Look at all the sand that has filtered into the supposedly closed chamber.
 Three incredibly small screws held the decorative piece in place.
And three slightly larger but still tiny screws connected the base.
It's hard to believe the amount of intrusion, even beyond the sealing gasket.
There was even a BUG inside - eeeee!
Certainly time for a good washing...and the glass was as dusty inside as it was outside.  Go figure.
 Not wanting to wet the wiring, I used a dry toothbrush to clean hard-to-access nooks and crannies.
Since the battery that came with the light is 'rechargable', I gave it a good cleaning, too...
using the fine side of an emery board to remove rust and debris, ensuring a good connection when it all gets put back together again.  I suppose this would have been a good time to just change batteries but I didn't have any of the rechargable ones.
Putting it all back together again, the light looks brand new and the glass itself is obviously cleaner and more transparent.
So, now I have this ONE light recharging itself by sitting in the umbrella hole of a sunny table and it's back to the process but I will be doing them 'assembly line' fashion so it won't take too long...and I might not start until tomorrow....or the day after.
 Taa-daa! 

Thursday, May 22, 2014

Cooler Corn - Hot Idea

GREAT IDEA FOR MEMORIAL DAY COOK-OUT 
I see ideas like this one on the internet all the time.  Some of them don't work.  
This one did and I was so surprised at how well it worked that I will never kitchen-cook corn on the cob for a crowd again...and you won't want to either. 

No more heating the kitchen and timing the boiling corn so that it will be done but not overcooked and tough.  Here's how it works: 
  • Preheat a clean cooler by rinsing with hot tap water.  
  • Place shucked corn inside.  
  • Pour a pot of boiling water over the corn.  (I used my spaghetti cooking pot)  
  • Close the lid and set the cooler aside. That's it!
While you are busy preparing the rest of the meal or putting burgers on the grill or driving to a picnic, the corn is taking care of itself.  Mine stayed in the cooler for 30 to 45 minutes.  I don't think the exact time matters a bit.  As we were serving plates, everyone got a kick out of serving their corn directly from the cooler.   It was tender, sweet and PERFECT.  

Give it a try and let me know if you are as pleased with the results as I was.  Enjoy!

Tuesday, May 20, 2014

Canning - Cia's Oil-Roasted Garlic Jalapenos with Warning!

This recipe and method was concocted by me the summer that I planted 24 feet of jalapeno plants. Ha! One of my first gardening adventures. I had no idea what a jalapeno plant would look like or how many peppers a single plant would produce. Needless to say, I had to get creative. This experiment turned out to be my greatest pepper success. The flavor is incredible and goes such a long way that a tsp. will flavor an entire pot of chili, a spoon dipped into the oil and used to stir salsa or Pico De Gallo will add all the heat and flavor needed and a drop smeared across a cooked hamburger patty will transport you to flavor and heat heaven.

Now, this is not a process that I would recommend to the faint-hearted. In fact, I wouldn't even post it except that it's one of my kids favorite things and I don't want their supply to dry up and wither away just because I do...at some point in the distant future, if you know what I mean. So, here goes...but be warned:
  1. Do not attempt this without wearing gloves as your hands will burn for 2 days and any body part you touch will hate you for hours.
  2. Do not use the water sprayer on your sink as the heat molecules will atomize, you will inhale them and start coughing so hard you will wet your pants.
  3. Don't use the disposal for the same reason.
  4. Do not use your exhaust vent while cooking unless it vents to the outside; if it recurculates, you will get a face full of pain that you won't forget for a very long time.
  5. Do not lean over pan while cooking, in fact, use a l-o-n-g handled spoon to stir and lean as far back as possible.
And, if these warnings are not enough to deter you, consider this...there are conflicting opinions concerning the safety of peppers canned in oil. Do NOT take my word for the health safety of my method. Check other sources and your extension office for additional information. Having said that...I've been making these for 25 years and serving them to my family with confidence. I have never had the seal on a jar fail or the contents spoil.
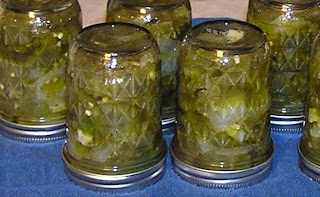
So here goes. As usual, start with sterilized jars, lids and rings waiting patiently submerged in simmering water. This recipe makes 6, 8oz. jars.
  • 2 1/2 lbs Jalapenos
  • 2 Onions - chopped in large pieces
  • 1 entire head Garlic - cloves separated, peeled and cut in half
  • 2 ozs. Vegetable Oil
  • 1 c. Olive Oil
  • Non-iodized Canning/Pickling Salt - to be used liberally
  • 3/4 c. White Vinegar - 5% acidity
Wash peppers. Cut stem end off or leave on, your call. Cut about 1/4 of the peppers in 1" pieces, leaving seeds in. With the remaining 3/4's, cut lengthwise, remove seeds and veins and cut in 1" pieces. Prep the onions and garlic. Put the oils in a large skillet and heat on medium-high. When oil is hot, add the peppers only. When peppers begin to "wilt", add garlic and onion. Stir and salt surface liberally. Continue to stir and toss until onions begin to turn translucent. Add vinegar and return to boil. reduce heat and work quickly. Using a caning funnel, spoon hot mixture directly from hot skillet into one hot jar at a time. Wipe jar rim and threads with a clean, damp cloth and add lid and ring. Screw ring tight and invert jar on folded towel. Continue, one jar at a time until done. when cool, wash jars leaving rings on for storage.

NOTE: If there are any "bits" or liquid left in the pan after all jars are filled, save in the refrigerator for tasting when cool. (Tiny taste) yummy!

Thursday, May 15, 2014

DIY Outdoor Time Saver

How many times I've walked into the front yard and noticed some little something that needed to be tended...something to be pulled or trimmed or fertilized and I let it go.  Almost always, the reason was the same; I only had a minute and whatever I needed to accomplish the task was un-handily kept in some distant location like the garden shed or the garage.

 My husband solved the problem by building this little front yard storage box.  No more complicated to build than a birdhouse, it keeps everything close at hand.  Mine is mounted on a landscape timber (planted like a fence post) so that it is an easily accessible and at a comfortable height for me but it could as easily stand in a flower bed as a piece of garden art.
Hooks on the back wall hold garden gadgets and a clothespin mounted on the little door keeps gloves hanging and handy.
After 3 or 4 years of constant and appreciated use, I gave it a bit of a facelift last year with a new coat of red paint and it ought to be good to go for another few years.

The point is not so much 'this' project as it is the advantage of convenience, having things handy when needed.  
SO HERE ARE SOME ALTERNATIVE IDEAS:
* A large flower pot with a tray on top can store hand tools and double as a side table.
* An old, metal cooler can be used as part of your outdoor decor.
* An upright, metal school locker can be painted to either stand out or blend in and will house larger gardening tools as well.
* A wicker basket or footstool also works well on a porch, out of the weather.


Having the things I need, where I need them, when I need them is a huge time and effort saver and eliminates most of my "excuses".

Monday, May 12, 2014

Canning - No Pressure Green Beans

All my canning skills were developed by a group of church ladies in Virginia who had lived off the land for generations. I took their word as gospel and lessons learned from them have served me well for 30+ years. They did not use a pressure canner for green beans so I don't either. If you have any questions about safety, please refer to this LINK.
Green beans are as simple to process as they are to cook. So here's the way it goes...get out your canning supplies and set the process in motion:
  1. Sterilize jars, rings and lids and start heating water in your canning pot and bring a large, second pot of water to a boil.
  2. Start with fresh, beautiful, unbruised beans. (You will need about 1 lb. of beans per quart)
  3. Inspect each bean, cutting off both tips, removing and blemishes and cutting in bite-sized pieces. (If the beans have strings, it is better to snap off the ends, pull the strings off and snap them into pieces)
  4. Wash the cut beans under cold running water.
  5. Pack them into hot sterilized jars, leaving plenty of space at the top. (headroom)
  6. Add 1 tsp. non-iodized canning-appropriate salt to each jar.
  7. Fill each jar with boiling water to within 1/2" of top.
  8. Wipe threads.
  9. Add lids and screw rings on comfortably tight.
  10. Set filled jars in canning rack and lower into boiling water in canning pot. Put lid on pot. Be sure the water covers the jar tops by an inch or two. Add more boiling water if level drops.
  11. Bring to a boil over high heat and process for 3 hours. Begin timing when water returns to a boil. (Once the water returns to a boil, heat can be lowered to medium to maintain a soft boil)
  12. Remove processed jars to a folded towel to cool leaving air circulation space between jars.
  13. Once the jars are cool to room temperature, check to make sure lids have sealed. Remove rings. Wash the cooled jars, write date on lid and move to storage.
  14. Any jars that did not seal should be reprocessed or refrigerated and used within a few days.
Take responsibility for your own food safety. Before opening any home processed jar, check to make sure lid is still "sucked-down" in it's concave position. Never use anything from a jar if it is discolored, foaming or has an "off" smell. Always bring home canned green beans to boiling before serving.

Friday, May 9, 2014

Almost Free Garden Art

Don't throw away that faded lawn ornament or even that old bowling ball. Melted marbles, broken plates, tiles or pennies can be glued to almost any surface and grouted with no experience at all.  It's fun for all ages...and almost free! 
Inspiration or need usually motivate me, but sometimes it's more mundane - like just being bored.
I had tucked an old terracotta saucer into a flowerbed as a watering hole for the critters that pass endlessly by and would have been quite satisfied with the effort if the rain hadn't set in for days and days.  All I could do was stand at the window looking at the yard work that wasn't getting done.  Suddenly my saucer looked as dreary as the day, in its dark garden spot.  
Then, as if I'd lost my marbles, I dodged the rain and brought it inside.  One of the items on my dreaded to-do list had been to sort and properly store my increasing collection of melted marbles.  What a great rainy day project.  I filled the afternoon gluing the melted marbles in place, finding a use for that last bit of tile Thinset that was drying in its bucket.
On the next sunny day, I did the messiest job of grouting you can imagine, just smearing it around with my hands...
 mushing it into the crevices and filling all the gaps.
After the grout dried for 10 minutes or so, I wiped it down with a sponge, clearing as much of the marbles as I could and polished them later with a dry cloth then set it inside to dry and cure completely for a week or so.
This is a cool product, (not the coating seen on TV).  This was recommended by the paint department manager and was actually cheaper than the "other" product.  I bought the clear-coat and gave my project a good water-proofing spray both inside and out...just because terracotta is so porous and we get mildew here easily.
 And that was it.  The dark spot in my little flower bed is now a little lighter and has a touch of color.  The critters have a place to visit and I had something to do on an otherwise unproductive day.
Now I'm looking for an old bowling ball at yard sales so I can get the grandchildren busy covering it with pennies...(copper keeps slugs out of the garden)