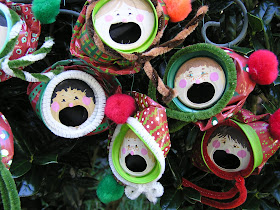
Go from this
with very little time and even less money.
Make a bunch to decorate an entire tree, give as gifts, tie onto packages or use as favors for guests leaving a party...or even better, after an evening of caroling.
 INSTRUCTIONS: Wash cans, remove pull-rings, tuck the tabs tight to the underside of the lid. Note: there will be a small semi-circle of pull-ring metal remaining around the "nose" button. This can easily be removed by grabbing it with pliers and pulling. Allow to dry completely. Paint a solid background color on the can sides, rim and bottom using spray paint, interior latex wall paint, even craft paint. Pre-sanding may be done but is not absolutely necessary (I don't). Paint your decorations on the can sides using ordinary craft paint. After everything is painted except the face, crush the cans. Inside the mouth can either be painted black or a small piece of black felt can be inserted and secured with a dot of glue. Paint the face simply. Remember that craft paint can be mixed with latex wall paint for color variations. I add a little brown craft paint to white wall paint to get a flesh color for painting the faces. This can be as light or dark as you like. Add decorations: pom poms, bells or bows to the hats...pipe cleaner "fur" around their faces, bits of greenery or berries salvaged from years past or thrift store bargains.
Attach hooks and hang on tree or other decorations.


OMG... these are the cutest "carolers"!!! What a cute idea! I love it!
ReplyDeleteDEMASIADO BELLO Y ORIGINAL. SALUDOS DESDE VENEZUELA. GRACIAS!!!!
ReplyDeleteSo do you cut the cans or just leave remaining part of can? Cause you are only decorating the bottom of can right?
ReplyDeleteCould you provide more detail for the "hats"...maybe a pattern if material or is it wrapping paper? Not sure...thanks!
ReplyDelete