Monday, May 31, 2010

Dressing Tomatoes - in shirts????????


Saturday morning, two of my sons-in-law stood on my deck complimenting my "hige, healthy, lush" tomato plants while I smiled proudly. Two hours later, the thunderstorm from hell hit. It must have been right on top of us as the thunder and lightning struck in unison. Strong winds blowing out of the south suddenly switched direction and seemed to come out of the north. Then everything just went haywire and the rain seemed to be pounding on every window in the house at the same time. A few well-leafed limbs and dozens of less healthy twigs and large branches of mistletoe began to accumulate in the front yard.

Hours later, as the rain eased to a drizzle, I rushed to check the tall and tender tomato plants, with their first little green offerings. I was crushed but not nearly so much as they were...bent, eben broken and lying over the rims of their pots. I carefully lifted their sad branches back into place and tied them with twill tape from my sewing stash. As I lifted and untangled and straightened and tied, I spoke soothing words with all the reassurance a mother gives to a wounded toddler. Of course, that was the exact time my husband walked onto the deck and asked who I was talking to. I'm sure he expected that he had caught me talking to myself again but I was quick to answer that I was talking to the plants. That didn't seem to surprise him in the least. He just said, "Oh", and continued on his way.

I felt pretty good about my rescue efforts and was greatly relieved to see the tied plants standing tall this morning. Then I felt equally distraught as the clouds rolled in a couple hours later. I knew that if we had the winds again, the plants would just bend over and break at the places where they were tied. The only idea I could come up with was to wrap them in something...but what. Then I thought of shirts. Of course! They would even button closed and I had a couple in my rag-bag waiting for me to cut the buttons off. (I'm glad my husband didn't overhear me explaining to the tomato plants why I was dressing them in old shirts - ha!)

Well, the rain. So did the lightning and thunder but the winds didn't. Still, we have storms continuing in the forecast for the next couple of days so I will leave the shirts in place until the weather clears. I'll post a note after that to let you know how dressing the tomato plants worked out.

Friday, May 28, 2010

Patriotic Holiday Decorations

The "patriotic" holidays are important in my family and Memorial Day is especially important. More than a backyard bar-b-q or a small town street fair, for us it is attending a memorial service to remember our fallen soldiers and having decorations as a way of acknowledging the day and honoring my husband, brother, father, grandfather and all the thousands who served with them.
I've always thought that life should be enjoyed and I'm finding that it can be done for a fraction of what I used to spend. This blog has become a challenge for me and I find myself celebrating every dime I save. This year, I spent a total of $13 on patriotic decorations welcoming visitors to our front porch. And the good news is that I will have them for use again next year. The better news (for me) is that they are just components so that I can mix them around, use them in different ways and have them feel "new" for a long time to come.
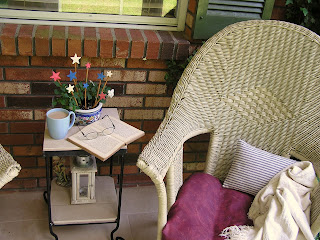
A few little flags from years past, standing in a seldom used vase, and new streamers with stars become the patriotic version of my versatile homemade table. The only other new things on the porch are a handful of craft store, wooden stars that I painted, and ribbon for the bow on the wreath.
The wreath itself was free and provided an adventure for a granddaughter and me as we pulled wild grape vines from trees in our backyard woods. We glued wire (using E-6000) to the backs of the painted stars and wired them in place the following day along with some borrowed Christmas berries. How simple is that? AND...to our surprise, we created a hiding place for one of our little tree frogs.Since the cushions on the porch chairs were already a muted red, covering a couple small pillows with blue and white ticking seemed a natural. A few of the stars glued to twigs and inserted into a plant already enjoying life on the porch gave me a cozy red, white & blue retreat for morning coffee.
AND...these decorations have begun to set the stage for Flag Day and will also serve to welcome guests to our Independence Day, 4th of July celebration. That's a lot of mileage out of $13.

For more patriotic holiday ideas, click HERE.

Thursday, May 20, 2010

Invitations

I love that I invested a whole $5 in a pack of card stock a couple of years ago. I haven't bought a greeting card or an invitation since.
Even if there's not an imaginative or creative bone in your body, you can make your own. There are just a few things to remember.
  • First of all, the computer is a huge reference library...sort of "idea central".
  • Second, perfection is not required. Stick figures and doodles and 1st grade quality printing are found on tons of commercial cards.
  • Third, make sure your creations will fit into envelopes you have on hand.
  • And forth, use what you have.
In this case, red Christmas ribbon applied with a glue stick gave me instant stripes. Crooked marker lettering and a doodle star resulted in a crisp, clean look. The ever so easy angel could be a piece of your child's art photographed, scanned & printed from your computer. It gets its finished look because of the background which doesn't even involve drawing a straight line. The blue "you Are Invited" patch is just a "Word" shape and lettering with a background color, cut out and glued over a card with a single red ribbon stripe. Uncle Sam and thousands of other images can be found online.

You will spend less time making your own than you would mulling over the hundreds of cards at the store and it can save you serious money over the course of a year.

Wednesday, May 19, 2010

Good Old Fashioned Patriotism

Whether we decorate for Fall or Thanksgiving, Christmas or Winter, Easter or Spring, when Summer approaches, at my house, it's all about patriotism. It's about love of country and appreciation for those who made it possible and still protect it for us. We are free to worship, think, speak, learn and become, to make mistakes and recover from them...and I'm proud to have it known that I would rather live here than any other country on earth.
So, for the next couple of weeks, I'll share my plans and projects and progress. In the meantime, here's some information for you.
  • Memorial Day - always the last Monday in May
  • Flag Day - June 14th every year.
  • Independence Day - July 4th every year.
Although the photographs on this blog are protected under copyright law, I am posting my photographs of American Flags and, through this public notice, I am giving permission for any and all of you to use my American Flag photos for your personal projects. Use them for your event invitations, letterheads, note cards, decorations, T-shirts, bumper stickers, etc.


More of my American Flag photos for your personal, non-commercial use are posted below.

Tuesday, May 18, 2010

Super Simple Muffins

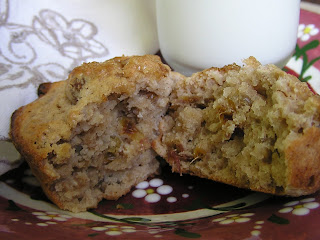
As often as I'm able, when the oven is already heated for something else, I'll mix a quick batch or two of muffins to stock the freezer. Muffins go from frozen to warm and ready-to-eat in 20 seconds in the microwave, turning an ordinary breakfast into something special or providing a nice accompaniment to an afternoon cup of tea.
The little pre-mix packages and boxes of muffin mix are so inexpensive that I seldom bother starting from scratch. But I do alter the mixes for flavor, texture and volume using whatever I might have on hand. Additional ingredients expand the mix resulting in larger muffins or more of the standard size making them even more of a bargain.

When our blueberries are ripe, I always add a bunch to the blueberry muffin mix. Sometimes, if I have no blueberries, fresh or frozen, I'll poke a large grape sized hunk of cream cheese into the center of each filled cup of batter before putting the pans in the oven.
  • To the Lemon-Poppy Seed muffins, try adding a good amount of sliced or slivered almonds
  • To Oatmeal muffin mix, add a handful of uncooked oatmeal and a heaping Tbsp of applesauce or pomegranate sauce as moisture to balance the added dry oatmeal, a handful of raisins or banana chips, and dash of cinnamon and wow!
  • To packaged banana nut muffins add additional...yep, crushed banana chips and walnuts...yummy!

Classic 1940's Southern Meatloaf

With clean hands, thoroughly mix the following ingredients in a large bowl:
  • 3 1/2 lbs Ground Beef (other ground meats may be substituted)
  • 2 small Onions - chopped
  • 3 slices Bread - wet and hand-squeezed dry
  • 1 1/2 c. Oatmeal (uncooked)
  • 2 Eggs
  • 1 c. Ketchup
  • Salt & Pepper to taste Form into two loaves 2"-3" high and as wide as you want your slices to be.
Cover top surfaces with additional Ketchup and bake 1hr. at 350 degrees.
Let stand 10 minutes before serving. Cool and refrigerate before cutting slices for the freezer. Wrap in individual servings for convenient use later on.

Old-fashioned Bottom Round Steak Stew

Layer items in 6 qt. crock pot in this order:
  • 3 Onions, quartered
  • 2 1/2 lbs Bottom Round Steak, cubed
  • 2 tsp. Black Pepper - sprinkled on
  • 3 Bay Leaves
  • 1 tsp Thyme
  • 5 stalks Celery - cut in 1" pieces
  • 6-8 lg. Baking Potatoes - peeled and cut large
  • Salt to taste
  • 24-26 oz. canned Whole or Chopped Tomatoes (with liquid)
  • 24-26 oz. Water or Wine
Cover. Cook in crock pot on High setting for 6 hours or until carrots are tender. Stir sometime midway through the cooking cycle. One hour before it should be finished, remove 1 cup liquid into a jar and cool. When it is cool, add 2-3 Tbsp Flour. Screw on lid and shake until there are no flour lumps. Stir flour/water mixture into stew and continue cooking the last hour. Add Additional salt and pepper before serving if needed.

Monday, May 17, 2010

Will We Have Pickles for the 4th of July?

Whoever said, "Great things often come in small packages" must have done a bit of gardening. Friday afternoon I picked the last of my lettuce from the two window boxes. After fluffing (is that a gardening term?), and watered the drying dirt I sprinkled cucumber seeds across the surface and a little more dirt across the seeds. It seemed there was only room for about half the seeds in the little package so I made use of a couple of egg cartons. Punching drainage holes in what would be the bottoms, I filled them with dirt and smoothed the surface. Using the point of a pencil, I made indentions to hold each of the carefully placed seeds and snugged the dirt in over the holes and gave the whole kit and kaboodle a misting of water.
Then the worrying began. Was the soil too wet? Had it dried too much in the heat of the day? Yesterday it seemed that it would rain so I tucked the egg cartons under a table and continued to worry about the seeds in the window boxes. But no rain - so I misted everything again this morning. This evening, and it's only Monday, when I went to check the dryness, or the wettness of my little seed beds, I found their primary leaves rising above the surface and couldn't wait to get the camera to share with you.
These are pickling cucumbers and I have such a great recipe for Sweet and Sour Dill Pickles that my mouth started watering the instant I began to calculate the days to maturity to see if we would have pickles by the 4th of July. Silly me, even if these are harvested and processed and looking beautiful in their jars, they are better after they "cure" a while. Fortunately, I have a jar or two left from last summer's harvest.

INDEPENDENCE DAY

If you plan to host a celebration on the
4th of July
YOU
need to get started now. Invitations should go out early in June so that your guests can schedule to attend. Over the next 2 weeks, I will be posting ideas for party planning, decorations, recipes and links...so check back.

Tuesday, May 11, 2010

Summer Squash

One of the best things about small town living is that locally grown produce is sold in our little independent grocery store. I couldn't resist this beautiful squash today and it made me think of two things. One, if it's perfection is the result of this season's sunshine and rain then I have great hopes for my crop of tomatoes. And two, I have never liked squash - ha!
But my mother absolutely loved it as though it was the sole purpose of an early garden. Mother had quirky, or maybe just very southern names for things. To her cornbread was a "pone", a paper bag was a "poke" and the liquid from any cooked greens was "pot-liquor". Molasses and grits were both plural and "they" were both good. So imagine my surprise when I discovered that her "summer squash" is properly called crook-neck squash and I must admit that I cooked it every summer for 20 years and forced myself to eat it just because it made me think of Mother.
Mother's "Stewed Squash"...Simple enough to do:
  • a little bacon drippings in an iron skillet with sliced squash and chopped onions
  • a little salt and a ton of pepper
It was cooked until it was tender and began to show bits of that caramelized, brown color. It is a classic to some but still, the dreaded summer squash to me.

MY WAY
About 25 years ago, (yes I've been cooking it for 45 years) I decided to find a way to love it. Combining everything in the photo makes a wonderful
Summer Squash Casserole
  • 4-6 cups of squash - cubed
  • a good amount of onions - coarsely chopped
  • one can of evaporated milk
  • one sleeve of Saltines - crushed
  • and whatever cheese you have on hand - grated
Reserve a little of the cheese for topping later. Just mix everything in a bowl, pour into a greased casserole, cover and bake at 375 degrees for 35 to 45 minutes or until the squash is tender.
Sprinkle the top with the remaining grated cheese and return to the oven for 5 minutes or so until it's all bubbly - YUM! I can make a meal of it. In fact, I did! Hope you give it a try and enjoy.
By the way, this freezes well in single servings and reheats in the microwave.

Gardening with Little Time or Money

Once upon a time, I lived in an apartment and wished I could have a garden. Then I lived on a farm and wished I didn't. Today I have the land but not the ability. Still, each spring the lure of growing my own, eating fresh and even saving on the grocery bill wins out over all the protests I can muster.
Over the past few summers, I've figured out what works for me and what doesn't. Plowing and tilling definitely don't...neither does bending and stooping and weeding and spending more on fertilizers and pest control than the harvest would cost if bought at the store. Containers, however, do work for me... easy to access, easy to water and weed and keep free of pests. A few flowers tucked in among the harvest and I feel like summer was worth the wait.
Lettuce, at $1.19 a 9-pack (last year they were $.99) grows in a couple of window boxes off the rails of the deck. I start picking fresh leaves almost immediately and take the entire heads much later...two or three months of fresh salad greens for less than $3. You have to like that.Jalapenos are planted in an old strawberry pot and all summer long, they produce more than we can possible eat which gives me the opportunity to put up my famed garlic-roasted peppers for the winter and for gifts to very special people. I buy the smallest containers of tomato plants possible and buy them early. That keeps the cost down and by the time the weather is cooperating, they have doubled or tripled their value in size. A trick I learned with tomatoes is to remove the lower leaves and plant the seedling as deep as possible without covering the leaves.Roots will branch out from the planted stem and result in strong, healthy plants. They are relegated to a couple of large pots and so far I've had good luck crowding 3 or 4 plants into a single pot. They produce enough to eat abundantly all summer with plenty for canning...which is about as simple as any canning project can be. Oregano, Basil, Rosemary and Parsley fill a corner of the deck and almost resent it if I try to "care" for them or don't take regular clippings for kitchen use.
I have a small pergola (8'x8') covered with Wisteria. The filtered sun and shaded area underneath has provided a perfect environment for Onions and Garlic, more Oregano and Lavender. A small pot of chives seems to like it under there, too. Every year I try to come up with something to fill the remainder of that space. This year, I'm trying for more tomatoes but it might be too shady. I wish I'd thought to plant peas early. Several years ago before the Wisteria had grown, they didn't do well in there because of the intensity of the sun but it might have been perfect this year.
The pictures show my scrawny start but I will re-post later in the season and we'll see how my lazy lady's cheapo garden is doing. In the meantime, I've thought of a few "free is my favorite price" gardening tips for alternatives to things like expensive fertilizers and toxic pesticides.

TIPS

Free Plant Food:
1) Look on your kitchen stove. Cool and use the water from boiling or steaming vegetables, pasta and shellfish. Use it to water your plants or put it in a spray bottle for a foliar feeding (sprayed directly on the plant leaves).
2) Instead of throwing fruit and vegetable scraps and peels away or down the disposal, save them in a plastic container with a lid, like a butter tub or ice cream container. When it is full, just drop the contents in a hole near your garden plants and cover with dirt.

Free Pest Control:
1) Soapy dish water, either poured over or sprayed on, takes care of some threatening bugs.
2) Hot red pepper flakes shaken on top of the soil around plants wards off squirrels and a multitude of other critters.
3) A natural bug spray for plants can be made with 2 c. water, 2 hot peppers and 2 Tbsp of Vegetable Oil. Liquefy in a blender, stir in a few drops of dish washing liquid and strain into a spray bottle for use directly on the plants.
4) Empty your pencil sharpener shavings around your plants.
5) Mulch around tender seedlings with well-crushed eggshells.
6) Mulch tomatoes with a few layers of wet newspaper topped with 2" of grass clippings to protect the plants from picking up harmful spores from the dirt.

Container gardening doesn't require expensive containers. Try these:
1) Old bucket or sand pail or wash tub
2) Boot lined with a plastic bag
3) Purse lined with a plastic bag
4) An old watering can
5) A discarded waste basket
6) A no-longer-usable child's wading pool or sandbox
7) A tissue box cover turned upside down (keep dirt from falling through the hole with old pantyhose or a plastic mesh produce bag)
NOTE: Punch drainage holes in anything with a solid bottom before using as a planter.

Just a thought:
1) Disposable plastic picnic knives make good plant labels. Write on the blade with permanent marker and insert the handle into the soil
2) Old kitchen sponges cut into 5 or 6 strips can be mixed with the soil the help retain moisture in your plants.

BE SURE TO CHECK THE COMMENTS FOR "TIPS" FROM READERS